Here we proceed with installing the Nginx web server. Web servers installed on Linux are divided into Nginx web servers and Apache web servers, and have the following differences. Apache is an open source HTTP server, while Nginx is an open source, high-performance asynchronous web server and reverse proxy server.
While the development and evolution of Apache HTTP Server is managed and maintained by a worldwide user community (Apache Software Foundation), Nginx is maintained and maintained by the company of the same name, founded in 2011.
While Apache provides various multiprocessing modules to handle client requests and web traffic, Nginx is designed to handle multiple client requests simultaneously with minimal hardware resources.
In Apache, a single thread is associated with one connection, but in Nginx, a single thread can handle multiple connections. This process consumes less memory and improves performance.
While Apache HTTP Server has a non-scalable multi-threaded architecture, Nginx follows an asynchronous event-based approach for handling multiple client requests.
The Apache server serves static content using traditional methods and handles dynamic content natively within the web server itself. Nginx, on the other hand, cannot handle dynamic content internally and relies on external processes to do so.
2. Install Nginx web server
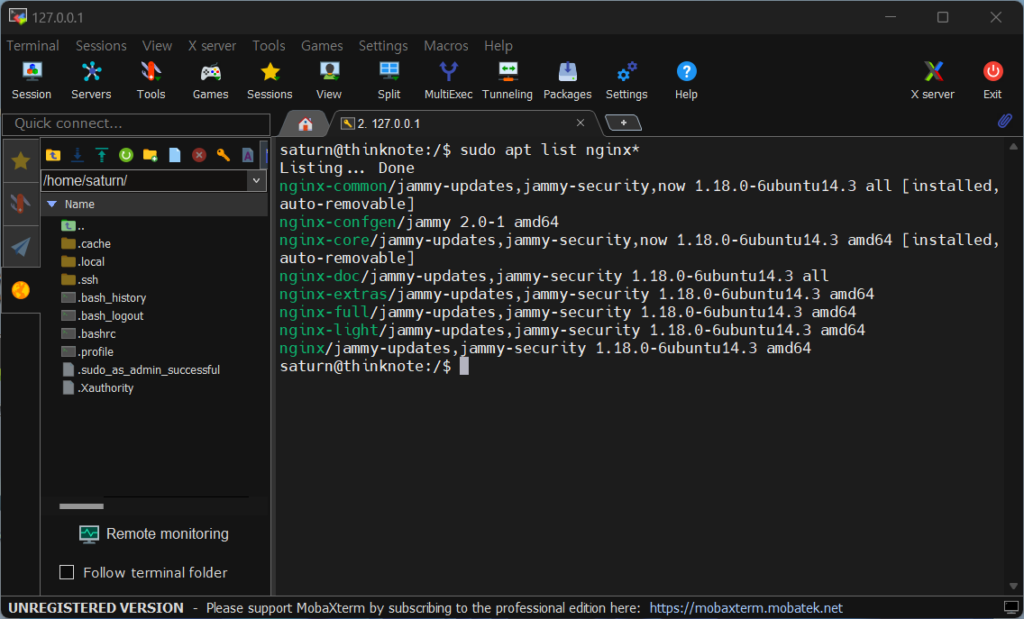
Update package information with apt update and apt upgrade. Check packages related to nginx with the list option. Install the nginx web server using the nginx installation command.
This command displays nginx-related package information.
sudo apt list nginx*
nginx ubuntu
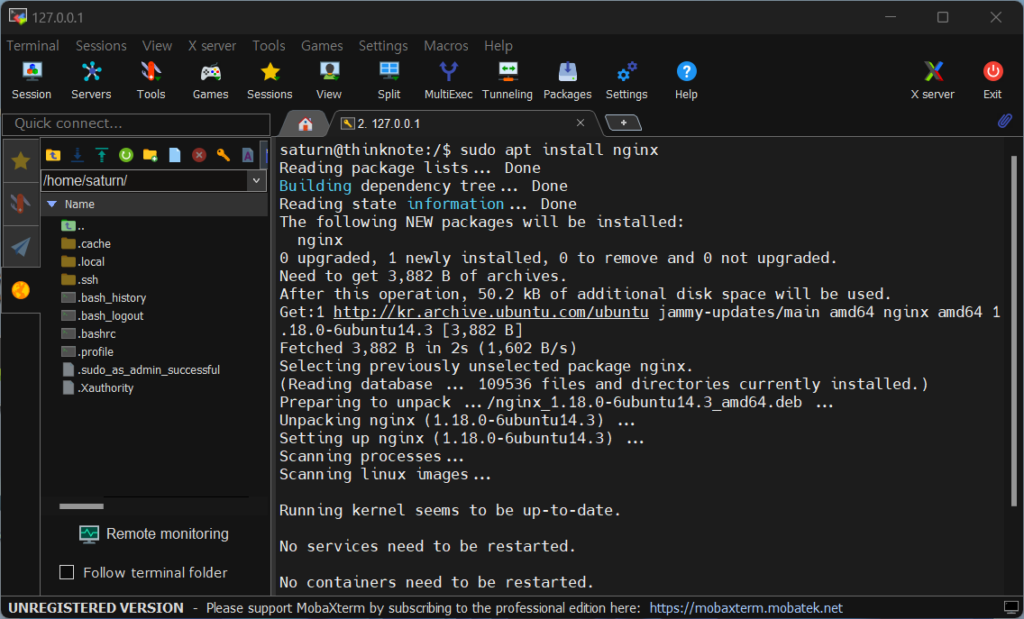
Run the command to install nginx.
sudo apt install nginx
nginx ubuntu
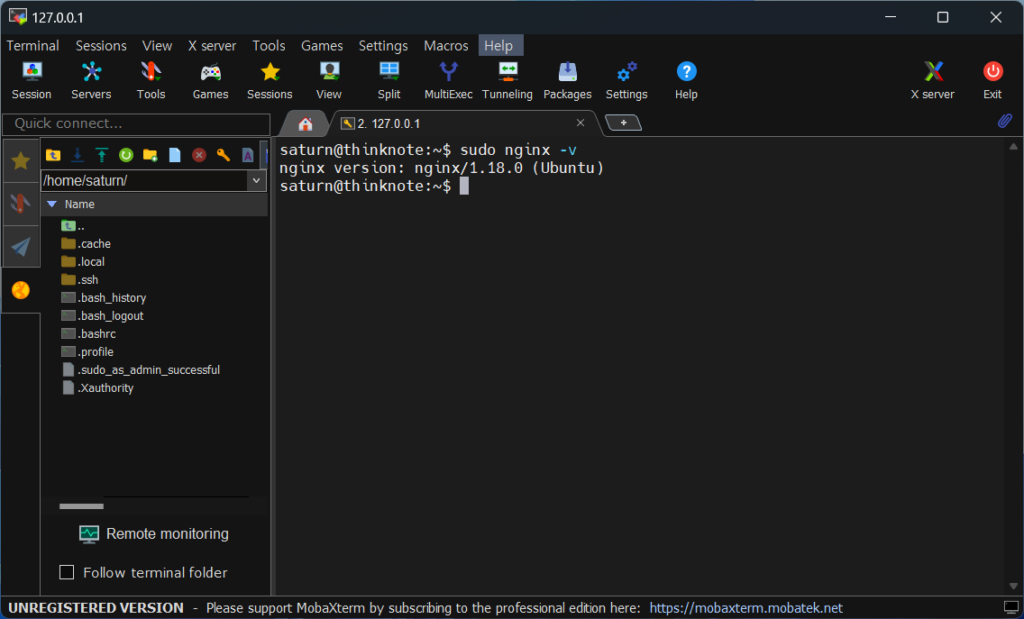
Check the version of nginx installed.
sudo nginx -v
nginx ubuntu
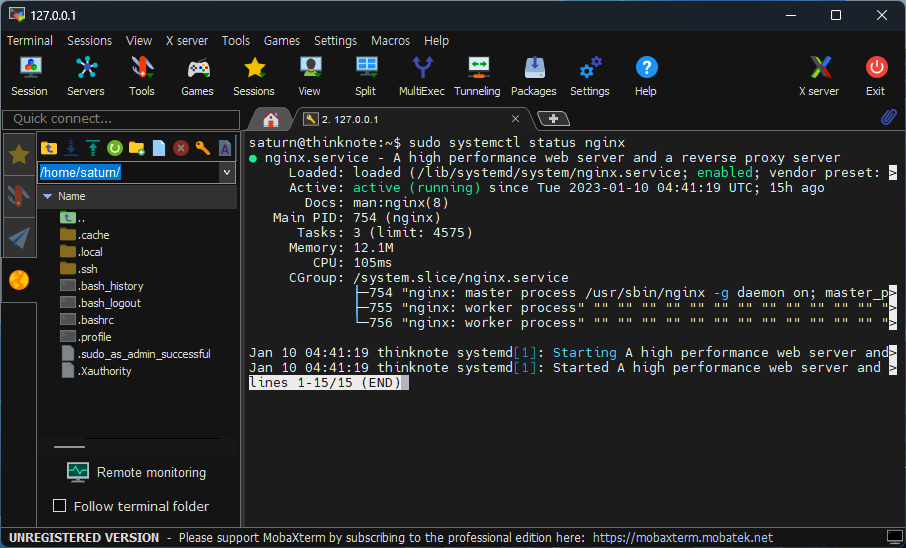
Check the status of the nginx service.
sudo systemctl status nginx
nginx ubuntu
2. Port settings for external connection
Even though the web server is installed, it does not mean that you can connect to it right away. The environment where Ubuntu is installed is composed of a virtual server on the host computer, and the Ubuntu server is provided with a firewall service using iptables.
The first step is to open a port on your ubuntu server. If you need to understand iptables, you can check it out through the following article.
Ubuntu firewall iptables configuration and management – Thinknote
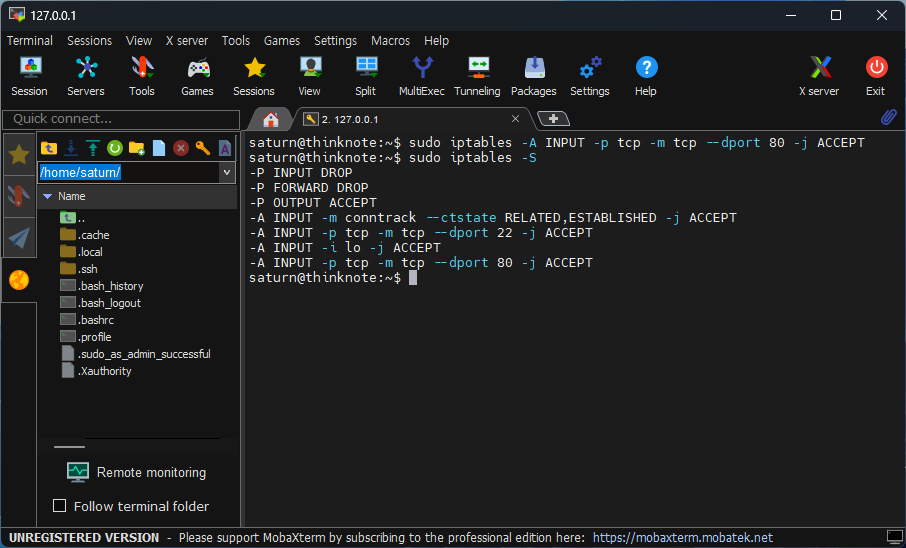
1) Allow nginx http port
The http port uses 80. Open iptables to use TCP port 80 and print out the rules to see if the chain is registered in iptables.
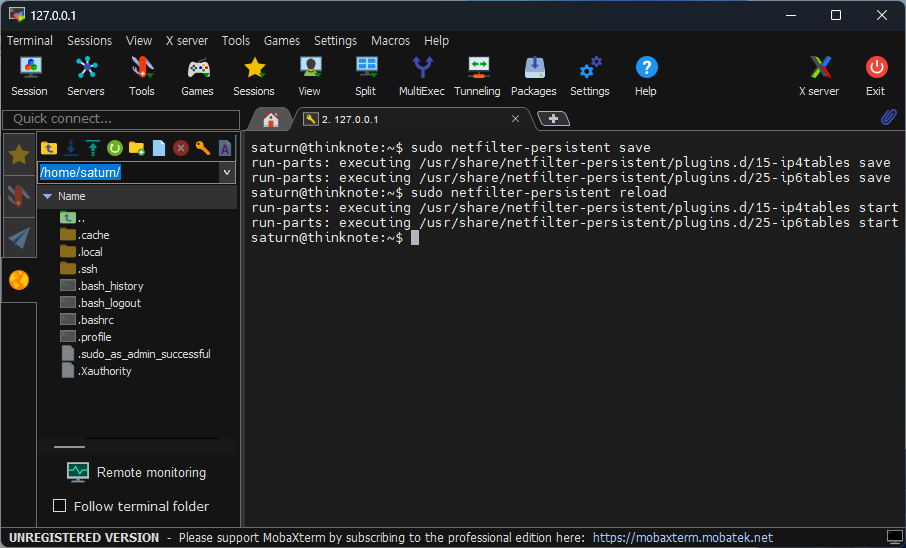
sudo netfilter-persistent save
sudo netfilter-persistent reload
iptables
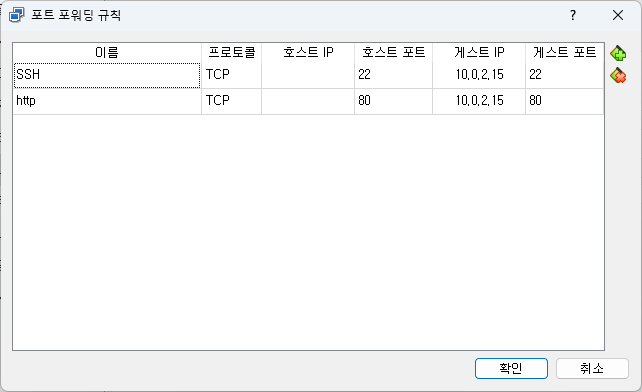
2) Add VirtualBox port
You must add a port to VirtualBox to be able to connect from the host computer’s IP or localhost (127.0.0.1). And if you are using a router, you can connect from outside by using the router’s DMZ function or the router’s port forwarding function. This does not cover the router’s DMZ settings.
If you want to know the detailed procedures of VirtualBox, you can click the link below.
Ubuntu SSH port settings and connection – Thinknote
Add forwarding to port 80 as shown in the image below.
virtualbox 80 port
3. Check Nginx web server connection
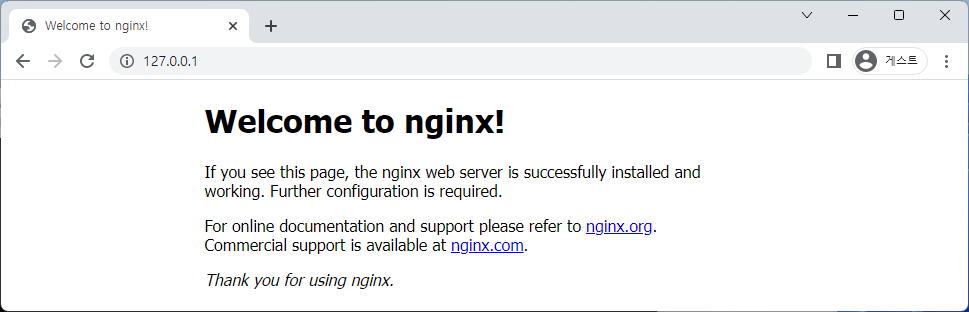
Once the port opening is complete, connect to the nginx web server on the Ubuntu server through the host computer’s Internet browser.
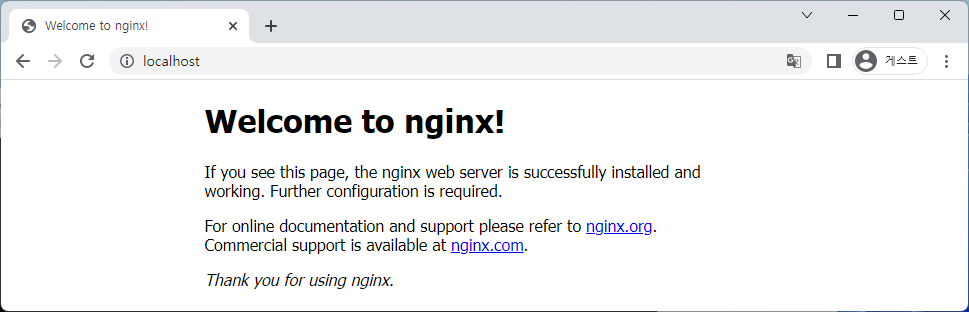
Connect to localhost (127.0.0.1)
nginxnginx
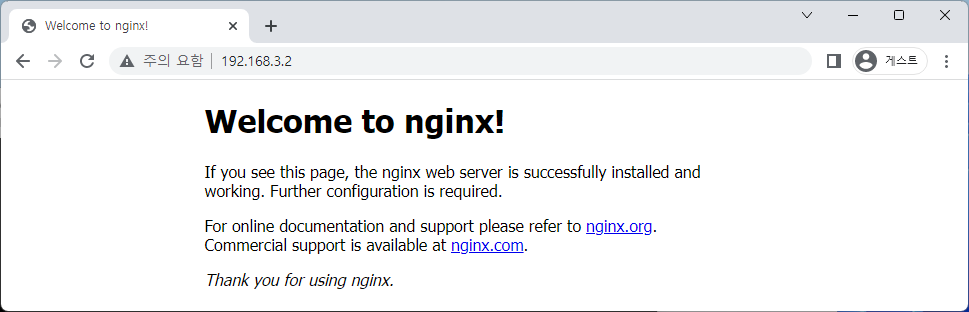
Connect to the internal IP of the host computer
nginx
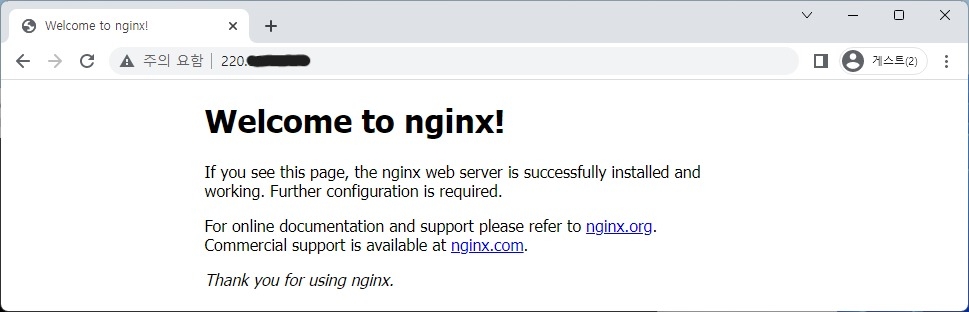
Connect to external IP
nginx
Good article to read together
Install Nginx web server (Centos 8)
Install and enable Ubuntu firewall iptables
Ubuntu firewall iptables setup and management
Install PHP 8 (ubuntu)
Setting up Nginx + Php8
Related Reading
Continue with these related Thinknote English articles in the Server & Infrastructure cluster.
This article is part of Thinknote’s English server and infrastructure archive. It focuses on practical Linux, Ubuntu, web-server, database, SSH, firewall, or hosting operations that readers can adapt to their own environment.
How should I use this guide?
Use it as a practical checklist and concept guide. Before applying commands on a live server, verify package names, OS versions, ports, and backup requirements for your own setup.
The purpose of installing PHP 8 is to use WordPress in conjunction with the Nginx web server. In the future, we will also cover how to use PHP to manipulate some data and insert PHP code, but rather, we will explain it for the purpose of operating WordPress developed with PHP.
PHP stands for Hypertext Preprocessor and is designed to implement dynamic web pages. You can create the desired web page by processing code written in PHP like an HTML file in the PHP engine. PHP is moving to version 8.x, and after 7.0, PHP code and HTML are written separately as separate files and are increasingly executed through php-fpm (PHP FastCGI Process Manager) rather than a web server.
Server-side open source software is often implemented in PHP. Representative programs based on PHP include WordPress, MediaWiki, and NextCloud. PHP has strengths in text and HTML processing, so it can apply a variety of things such as URL parsing, form processing, and regular expressions, and supports various databases.
Various programming languages such as Java and Python are widely used, but continuous development is underway based on the influence of open source.
2) PHP features
PHP has four characteristics: simplicity, efficiency, security, flexibility, and familiarity.
PHP can perform system functions i.e. create, open, read, write and close files on the system.
PHP can collect data from forms, i.e. files, save data to files, send data via email, and return data to the user.
Add, delete and modify elements in the database via PHP.
Access cookie variables and set cookies.
PHP allows you to restrict users from accessing some pages on your website.
You can encrypt your data.
3) Utilization of PHP
Tasks that would have required multiple Includes to be accessed in Java or C language are built-in functions, so they can be easily implemented with a small amount of code. Current PHP has evolved from a procedural form to a state where ‘object-oriented (class)’ programs can be written.
PHP can generate dynamic page content.
PHP can create, open, read, write, delete and close files on the server.
PHP can collect form data.
PHP can send and receive cookies.
PHP can add, delete and modify data in the database.
You can control user access using PHP.
PHP can encrypt data
2. Install PHP 8
1) Preparation for PHP 8
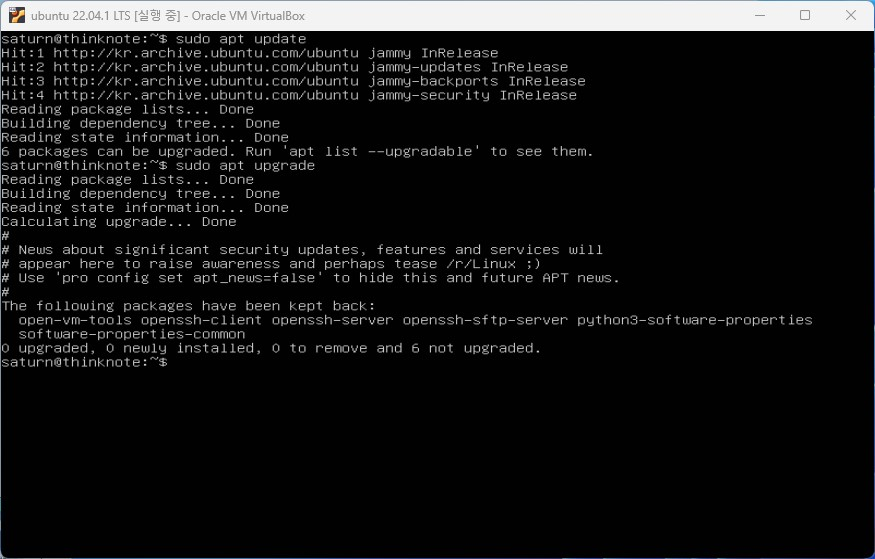
Update and upgrade Ubuntu packages.
sudo apt update
sudo apt upgrade
php 8
2) Check and install PHP 8 package
You can check items related to PHP with the apt list command. However, because there are so many PHP-related packages, I am hesitant about what to install. In particular, since PHP versions vary, a specific version may be required for the development environment of existing programs.
The core of the PHP installation is php-fpm. Depending on the PHP version, it exists for each version such as php7.x-fpm, php8.x-fpm, etc. We will cover how to install a specific version in another article.
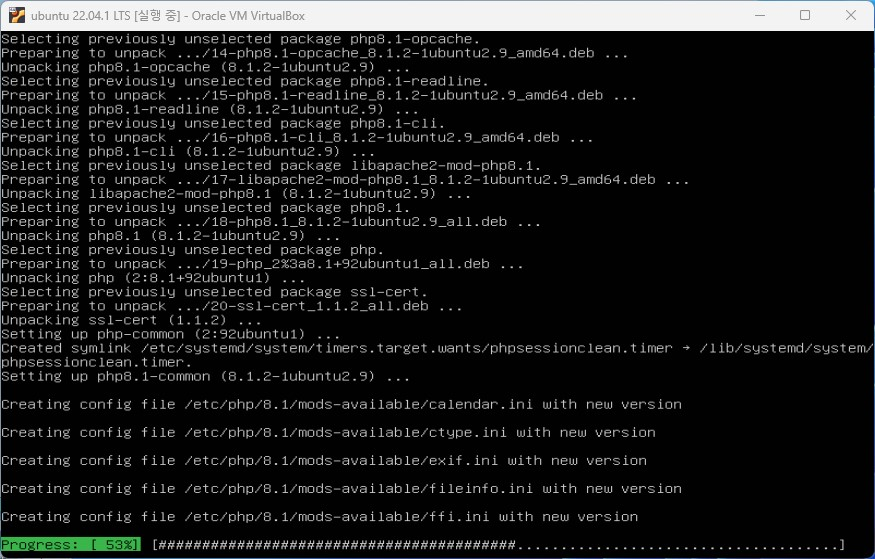
Check the core packages of your PHP 8 installation with apt list *fpm. Here, php-fpm is version 8.1 and php-fpm is version 8.1.2. The latest version may be good, but it is also a good idea to avoid the most recent version because compatibility problems may occur.
sudo apt list *fpm
php 8
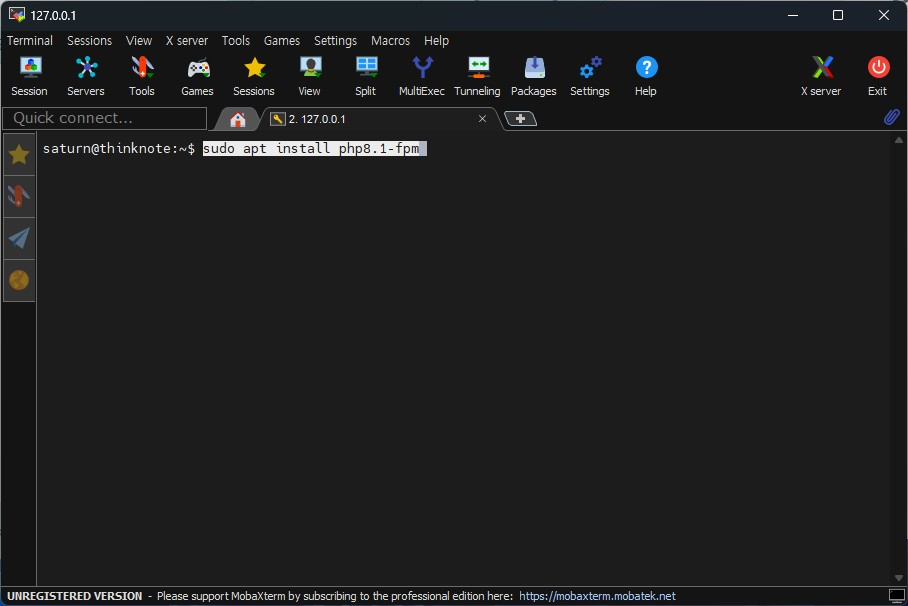
Here we install php.
sudo apt install php8.1-fpm
php 8php 8php 8
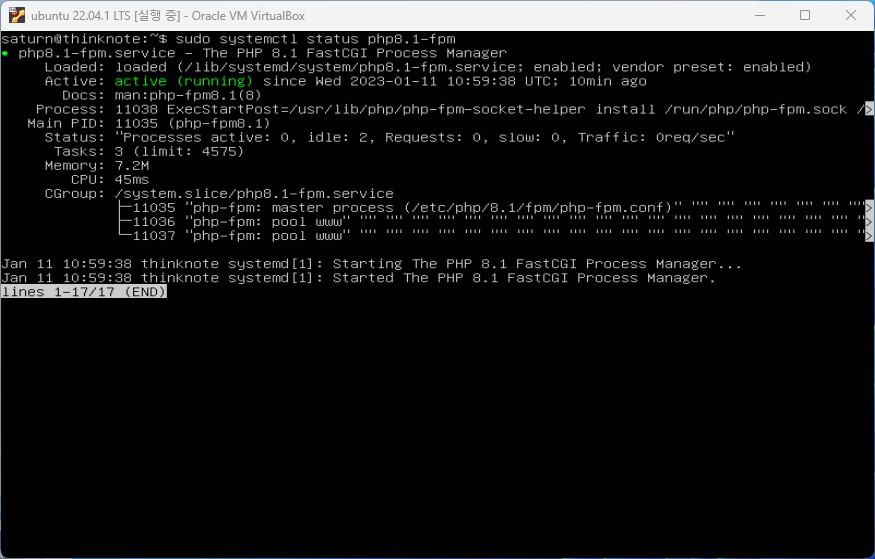
3) Check PHP 8 status
To check that the installation is complete and operating properly, run the sudo systemctl status php8.1-fpm command. If you previously installed a specific version, you can check it by writing the version in php.
sudo systemctl status php8.1-fpm
php 8
The service is running normally. Looking at the output, the service operates as php8.1-fpm.service and the conf file is /etc/php/8.1/fpm/php-fpm.conf.
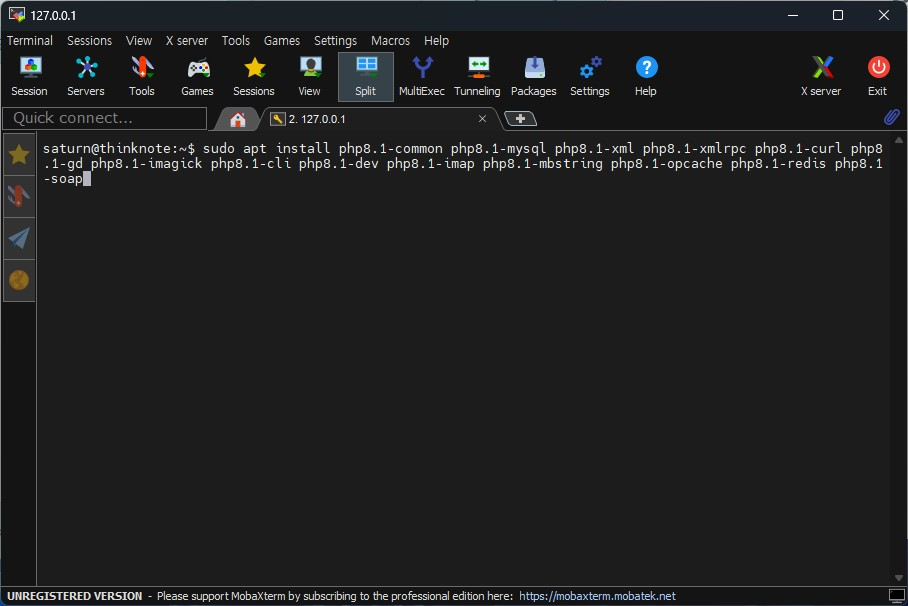
4) Additional installation of php 8 package for WordPress
Some packages may not be needed right now. However, since it doesn’t really matter if you install it in advance, install all the basic packages.
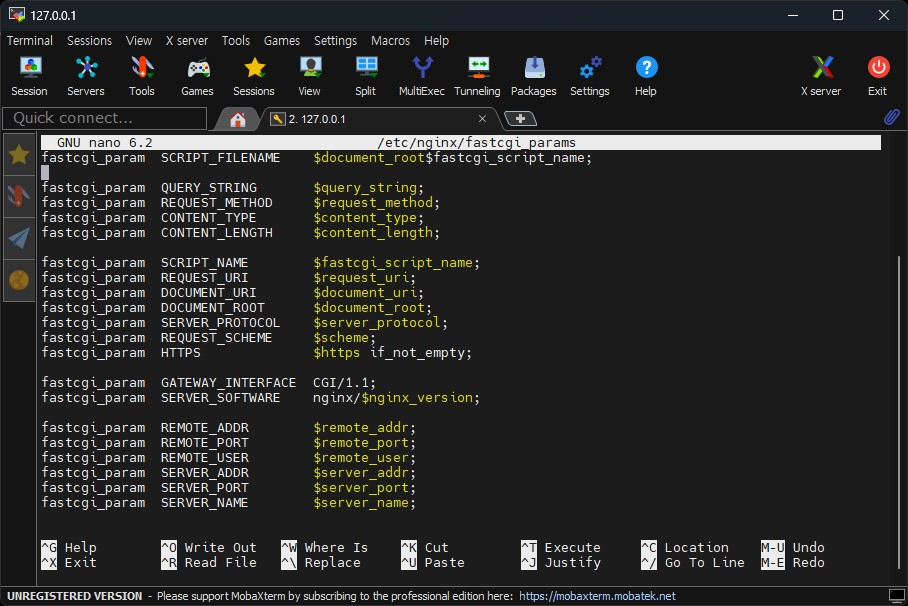
Installing the PHP package does not mean that the PHP file will be applied to the web server. Some files need to be modified so that nginx can serve PHP.
1 file exists and 3 files need to be modified.
The /etc/nginx/nginx.conf file exists.
Check and add fastcig_param in /etc/nginx/fastcgi_params
Add and modify php script in /etc/nginx/sites-available/default setting
default_type in /etc/nginx/nginx.conf
Fourth, if you do not fix it, there will be a problem where the php file will not run and be downloaded.
1) Check /etc/nginx/nginx.conf
If you followed the previous installation and steps, the nginx.conf file exists. If you don’t have it, just copy the following content and create a file. If you copy the contents below to create a file, you can skip step 4.
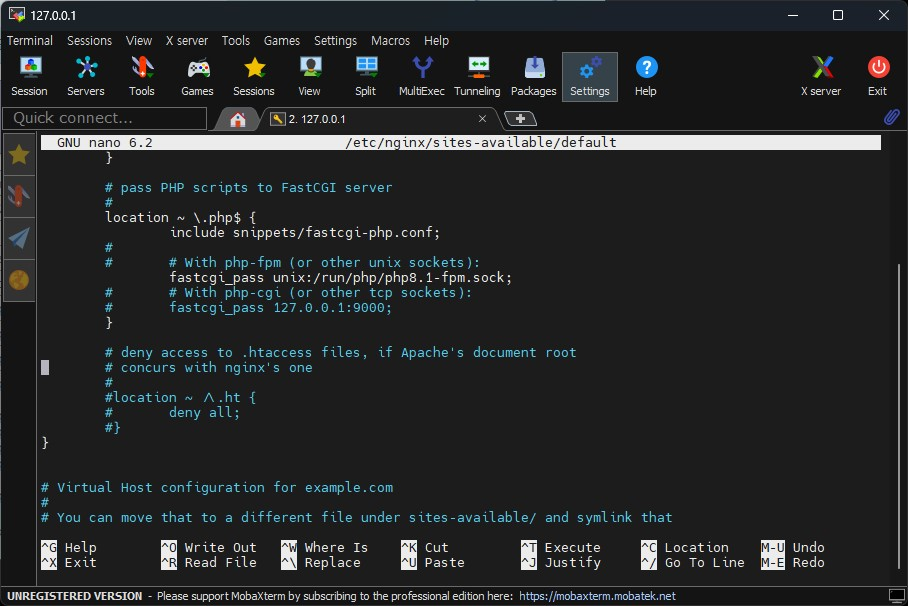
3) Add and modify php script in /etc/nginx/sites-available/default setting.
Run the default file with an editor and modify the location part as follows. Here, we modify it based on version 8.1. Simply find and change the following part of the existing file:
# pass PHP scripts to FastCGI server

location ~ \.php$ {
       include snippets/fastcgi-php.conf;

       # With php-fpm (or other unix sockets):
       fastcgi_pass unix:/run/php/php8.1-fpm.sock;
}
Create a file to check PHP information. The file is created in the web root.
sudo nano /var/www/html/info.php
Copy and paste the following content according to the PHP code rules.
<?php
phpinfo();
?>
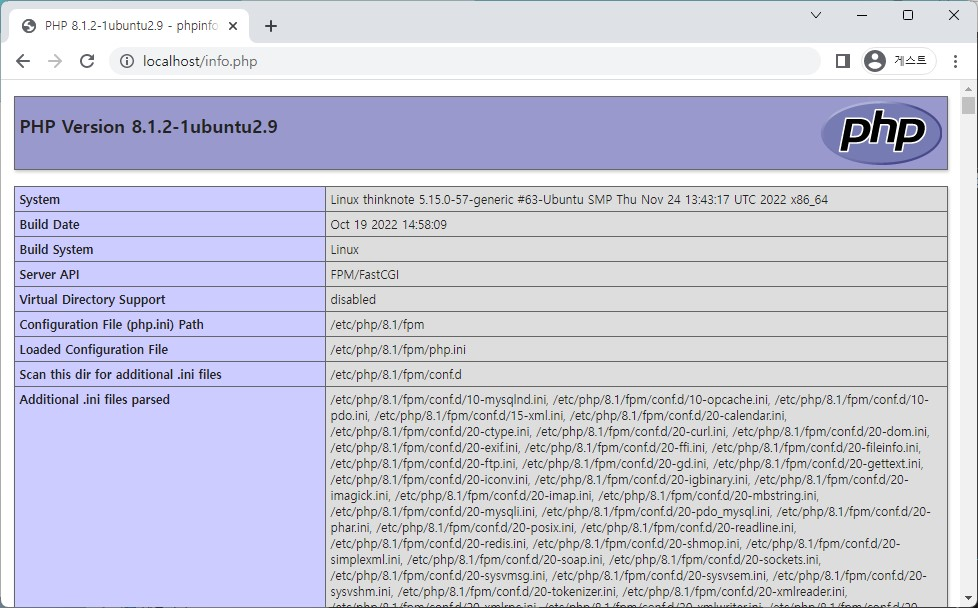
Check the php information on the website with localhost/info.php or address/info.php.
Article image 10
Please note that in order to install WordPress, you must modify the php.ini file. Executing the php file and modifying the php.ini file will be covered in the WordPress installation article.
Good article to read together
Setting up Nginx + Php8
Free HTTPS setup (Let’s Encrypt, Cloudflare)
Install memory caching APCu, Redis, Memcached
Install Nginx web server (Centos 8)
Install Nginx web server (ubuntu)
Related Reading
Continue with these related Thinknote English articles in the Server & Infrastructure cluster.
This article is part of Thinknote’s English server and infrastructure archive. It focuses on practical Linux, Ubuntu, web-server, database, SSH, firewall, or hosting operations that readers can adapt to their own environment.
How should I use this guide?
Use it as a practical checklist and concept guide. Before applying commands on a live server, verify package names, OS versions, ports, and backup requirements for your own setup.
Installing the nginx php8 package does not mean that the php file will be applied to the web server. Some files need to be modified so that nginx can serve php8. If your settings are incorrect, php8 will not work properly with nginx. In particular, there is a problem where nothing appears when the php file is downloaded or when phpinfo or php code is run.
The part we are checking now will help PHP operate properly on the web server through nginx and PHP8 settings.
1 file exists and 3 files need to be modified.
The /etc/nginx/nginx.conf file exists.
Check and add fastcig_param in /etc/nginx/fastcgi_params
Add and modify php script in /etc/nginx/sites-available/default setting
default_type in /etc/nginx/nginx.conf
Fourth, if you do not fix it, there will be a problem where the php file will not run and be downloaded.
1) Check /etc/nginx/nginx.conf
If you followed the previous installation and steps, the nginx.conf file exists. If you don’t have it, just copy the following content and create a file. If you copy the contents below to create a file, you can skip step 4.
The user set below may differ depending on the PHP version. user must match the user, group, listen.owner, and listen.group information in sudo nano /etc/php/8.1/fpm/pool.d/www.conf.
3) Add and modify php script in /etc/nginx/sites-available/default setting.
Run the default file with an editor and modify the location part as follows. Here, we modify it based on version 8.1. Simply find and change the following part of the existing file:
# pass PHP scripts to FastCGI server

location ~ \.php$ {
       include snippets/fastcgi-php.conf;

       # With php-fpm (or other unix sockets):
       fastcgi_pass unix:/run/php/php8.1-fpm.sock;
}
Create a file to check PHP information. The file is created in the web root.
sudo nano /var/www/html/info.php
Copy and paste the following content according to the PHP code rules.
<?php
phpinfo();
?>
Check the php information on the website with localhost/info.php or address/info.php.
Article image 3
This article was written by selecting only the problem-solving part of the PHP8 settings after installing nginx, and is duplicated with the previous article. If you want to know more about installing nginx, click the following link:
Install Nginx web server (ubuntu) – Thinknote
If you want to install php8 with Ubuntu’s nginx installed, click the following link. PHP installation is a preparatory step for installing WordPress.
Install PHP 8 (ubuntu) – Thinknote
Good article to read together
Install PHP 8 (ubuntu)
Install memory caching APCu, Redis, Memcached
Install Nginx web server (ubuntu)
Free HTTPS setup (Let’s Encrypt, Cloudflare)
Install Nginx web server (Centos 8)
Related Reading
Continue with these related Thinknote English articles in the Server & Infrastructure cluster.
This article is part of Thinknote’s English server and infrastructure archive. It focuses on practical Linux, Ubuntu, web-server, database, SSH, firewall, or hosting operations that readers can adapt to their own environment.
How should I use this guide?
Use it as a practical checklist and concept guide. Before applying commands on a live server, verify package names, OS versions, ports, and backup requirements for your own setup.
OpenSSL is a collection of libraries and tools that implement encryption and security protocols. It is primarily used on Linux operating systems, but can be used on other operating systems as well. OpenSSL included with Ubuntu Server has the following functions and features:
Encryption and hash functions: OpenSSL supports a variety of encryption algorithms (AES, DES, RSA, etc.) and hash functions (MD5, SHA-1, SHA-256, etc.). This allows users to store or transmit data securely to ensure data security.
SSL/TLS Protocol: OpenSSL is used to implement the Secure Sockets Layer (SSL) and Transport Layer Security (TLS) protocols. It encrypts communications between servers and clients, ensuring the confidentiality and integrity of data and protecting against man-in-the-middle attacks.
Certificate Management: OpenSSL supports the X.509 certificate format, allowing you to create, manage, and verify public key certificates. It establishes a trust relationship between a server and a client and is used in e-commerce and authentication systems.
Encryption key and CSR generation: OpenSSL can generate symmetric and asymmetric encryption keys. Additionally, you can generate a certificate signing request (CSR) and send it to the certification authority. CSR is used to request issuance of a server certificate.
Command-line tools: OpenSSL includes command-line tools, allowing developers and system administrators to perform tasks such as encryption, hashing, certificate management, and more.
Open Source: OpenSSL is an open source project, with many developers contributing to it. This helps verify source code and strengthen security, and has the advantage of receiving community support and updates.
2. Install OpenSSL
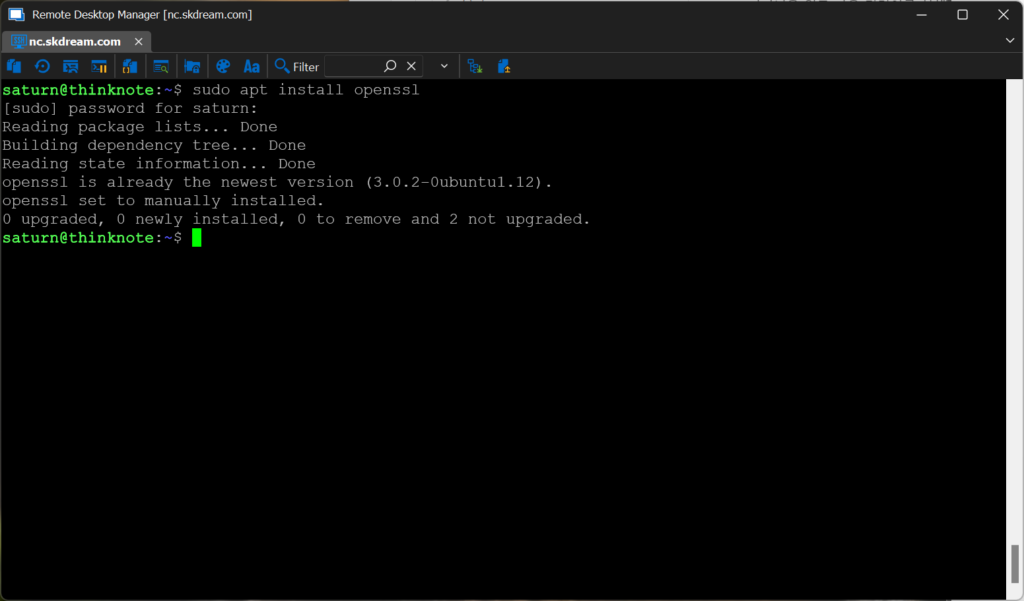
1) Install OpenSSL
OpenSSL on Ubuntu Server is used to implement secure network communication by providing the above functions and features.
sudo apt install openssl
Article image 1
Install OpenSSL by running the following command:
1) Check OpenSSL version
openssl version
3. Create param key
1) param necessity
The reason for using Openssl to generate param keys is mainly to generate parameters needed for security algorithms such as:
Diffie-Hellman (DH) Key Exchange: DH is a type of public key cryptosystem that allows secure communication without sharing two different private keys. DH requires shared parameters p and g, which can be generated using OpenSSL.
RSA encryption: RSA is a public key encryption method that uses prime numbers p and q to generate private and public keys. You can generate these prime numbers using OpenSSL.
You can change the size and file name according to your needs. There is also a way to use OpenSSL to generate the parameters needed for other encryption algorithms. The param key is used to generate parameters required for the Diffie-Hellman (DH) key exchange protocol used by OpenSSL. The DH protocol is a type of public key cryptosystem, used to generate a secret shared key between two entities. These secret keys can be used for secure communications.
4. Additional study material
If you would like to learn more about OpenSSL, you can refer to the following resources:
OpenSSL official documentation
OpenSSL page on Ubuntu Wiki
Thinknote
Good article to read together
Installing and managing MariaDB (MySQL)
Activate Centos 8 RHEL & REMI Repository
Linux administrator tool – enable cockpit
Install Ubuntu 22.04.1 (VirtualBox)
VirtualBox Virtual Box virtual machine download and installation
Related Reading
Continue with these related Thinknote English articles in the Server & Infrastructure cluster.
This article is an English translation and global-reader adaptation of the original Thinknote article “Install OpenSSL.” It preserves the original article’s main explanation, examples, and practical context.
Why is it translated into English?
The English version helps global readers access Thinknote articles through English search keywords while keeping the Korean source available as the original reference.
1. Database package that can be installed on Ubuntu
MySQL: A popular open source relational database management system (RDBMS).
PostgreSQL: A powerful open source RDBMS that offers many features and extensibility.
MongoDB: A document-oriented NoSQL database.
SQLite: A lightweight, open source relational database engine suitable for embedded systems and small-scale applications.
Redis: A high-performance key-value store and memory-based data structure server.
MariaDB: A fork of MySQL that offers improved performance and stability while maintaining compatibility.
2. Understanding MariaDB
MariaDB is an open source relational database management system (RDBMS) that began as a fork of MySQL. It is fully compatible with MySQL, and users can easily migrate from their existing MySQL environment to MariaDB. MariaDB is used as the basic RDBMS in many Linux distributions.
Performance: MariaDB provides excellent performance for processing large amounts of data. Performance improvements have been achieved through optimizations such as query optimization, indexing functions, and parallel processing.
Scalability: MariaDB can scale your database servers horizontally and vertically. Scalability can be achieved in a variety of ways, such as master-slave replication and clustering.
Security: MariaDB places a strong emphasis on database security. It provides features such as SSL/TLS encryption, access control, and data masking to ensure the safety of your data.
Openness: MariaDB was developed as open source, allowing users to access the source code to modify and improve it. It also offers a variety of plugins and extensions to customize it to suit your needs.
2) MariaDB Advantages
MariaDB is fully compatible with MySQL, so existing MySQL users can easily migrate.
MariaDB delivers fast performance with optimized query processing and indexing features.
MariaDB allows you to flexibly scale your database servers.
MariaDB is stable in many Linux distributions and provides features for error recovery and fault tolerance.
3) Disadvantages of MariaDB
Because it has a relatively small community compared to MySQL, troubleshooting and support can be difficult to find.
MariaDB is compatible with MySQL, but differences may occur in some specific features, which may cause some applications to not work properly.
3. Install MariaDB
1) Preparing MariaDB in advance
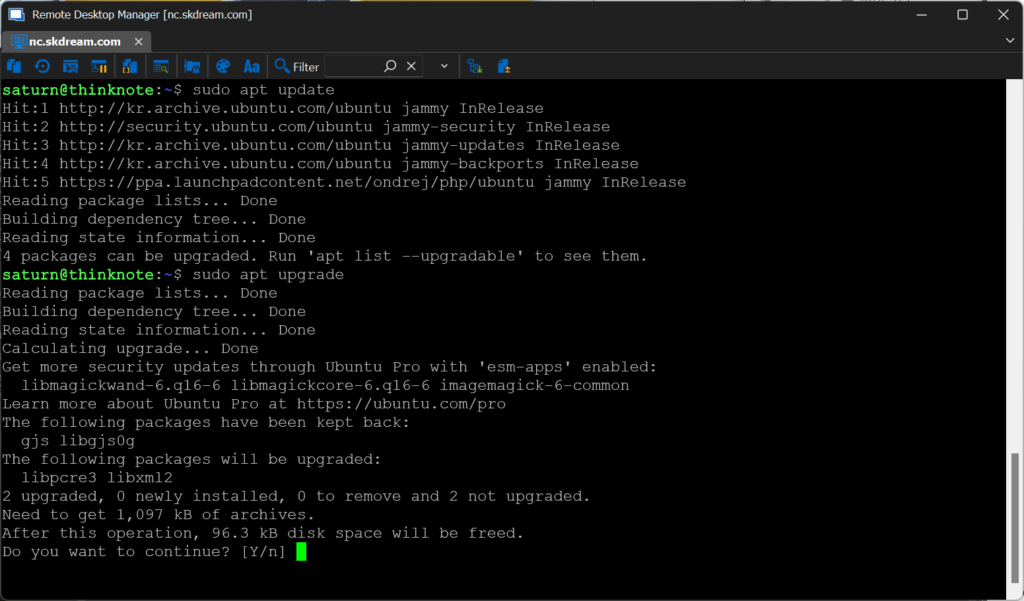
Update and upgrade Ubuntu packages.
sudo apt update
sudo apt upgrade
Article image 1
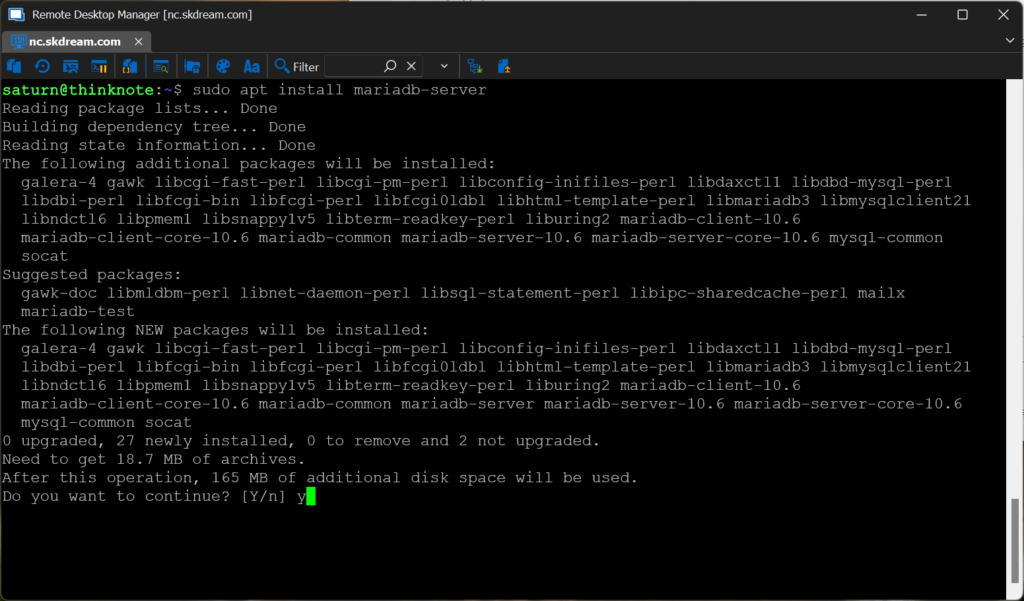
2) Install MariaDB
sudo apt install mariadb-server
Article image 2
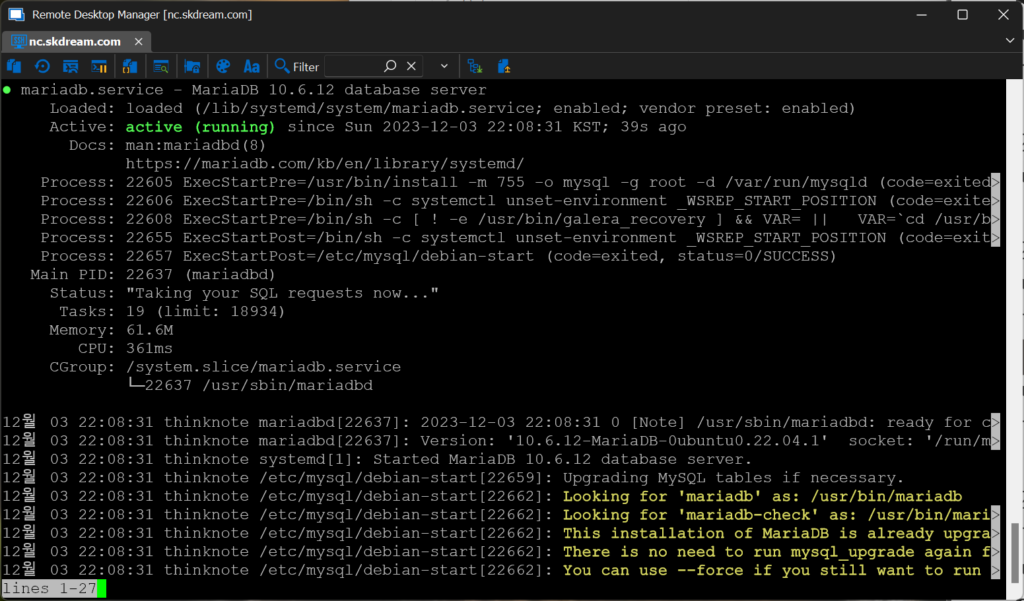
2) Check MariaDB service
Once installation is complete, the MariaDB service will start automatically. To check the service status, run the following command:
sudo systemctl status mariadb
Article image 3
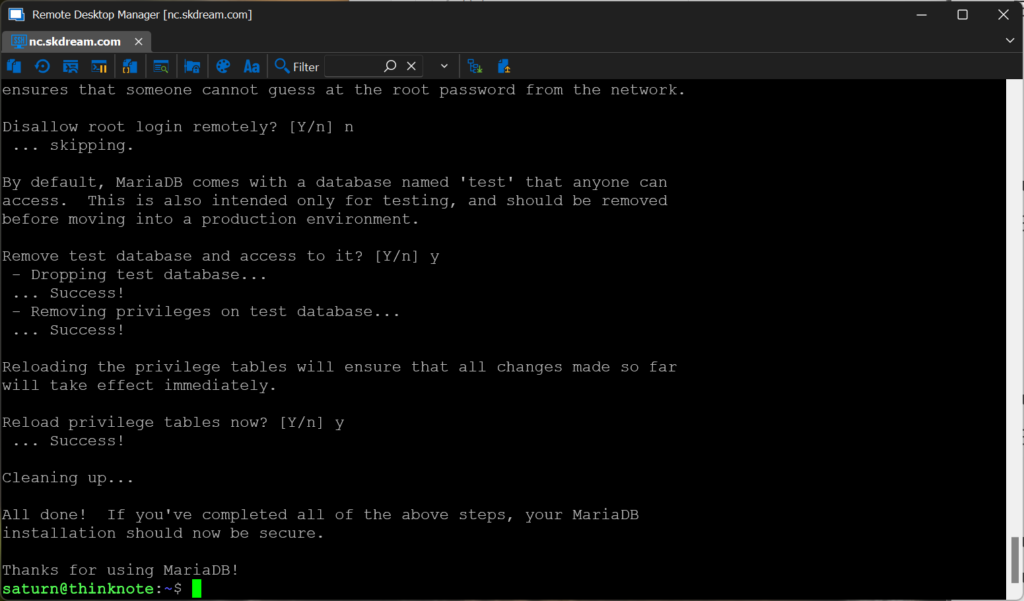
3) Run MariaDB security script
To configure MariaDB more easily, run the security script by running the following command:
Enter current password for root: During initial installation, there is no password, so press enter.
Change the root password: Enter Y and set the password.
Remove anonymou user: Type Y to remove an anonymous user.
Disallow root login remotely: Enter Y to enable remote login or N to disable it.
Remove test database and access to it: Type Y to delete the test database.
Reload privilege tables now: Type Y to save changes.
sudo mysql_secure_installation
Article image 4
The security settings for your MySQL server are now complete.
Thinknote
Good article to read together
Install OpenSSL
Activate Centos 8 RHEL & REMI Repository
Linux administrator tool – enable cockpit
Install Ubuntu 22.04.1 (VirtualBox)
VirtualBox Virtual Box virtual machine download and installation
Related Reading
Continue with these related Thinknote English articles in the Server & Infrastructure cluster.
This article is part of Thinknote’s English server and infrastructure archive. It focuses on practical Linux, Ubuntu, web-server, database, SSH, firewall, or hosting operations that readers can adapt to their own environment.
How should I use this guide?
Use it as a practical checklist and concept guide. Before applying commands on a live server, verify package names, OS versions, ports, and backup requirements for your own setup.
Let’s Encrypt is a certification authority that issues SSL/TLS certificates for free. Let’s Encrypt on Ubuntu systems allows you to provide secure HTTPS connections to your web servers.
Free: Let’s Encrypt is a public project that is free to use. So, you can get an SSL/TLS certificate without any cost issues.
Automation: Let’s Encrypt automates the certificate issuance and renewal process to make it easier to use. This generally means that you can issue and renew certificates by simply typing a single command line.
Security: Let’s Encrypt enhances security by providing encrypted HTTPS connections for all connections. This helps keep your data and personal information safe.
2) Cloudflare.com
Cloudflare is a company that provides web security and performance optimization services. The company routes traffic through a global network to improve the speed, security and availability of websites, and protect against malicious activity. It has features to compress and optimize web content.
Cloudflare’s main features can be seen like this:
CDN (Content Delivery Network): Helps users access your website faster through Cloudflare’s global network.
Web Firewall: Provides a firewall to protect against malicious activities such as DDoS attacks, SQL injections, etc.
SSL/TLS Encryption: Securely transmit your website using SSL/TLS certificates.
Performance optimization: We use techniques such as caching, image optimization, and JavaScript minimization to improve your website’s loading speed.
Advantages of Cloudflare
High Availability: Cloudflare distributes traffic across a global network, increasing the availability of your website.
Enhanced security: Provides a powerful web firewall to protect against DDoS attacks and other malicious activities.
Improve performance: We use caching and optimization techniques to improve the loading speed of your website.
2. Install and configure Let’s Encrypy package
1) Install Let’s Encrypt
Install Certbot: Certbot is the official client for Let’s Encrypt and is a tool for issuing and managing certificates.
Install Certbot with the following command:
sudo apt update
sudo apt install certbot
The python3-certbot-dns-cloudflare package provides the ability to automatically add and manage domain records to Cloudflare’s (DNS provider) DNS servers using Certbot’s DNS-01 domain validation method and operates in the following order:
Certbot asks you to add a specific TXT record to Cloudflare DNS servers to verify that you own the domain.
The python3-certbot-dns-cloudflare package uses the Cloudflare API to log in with an authenticated user account.
The package adds a TXT record to the Cloudflare DNS server based on the authentication request information received from Certbot.
Certbot verifies that the record is reflected in Cloudflare DNS servers.
When authentication is successfully completed, Certbot issues an SSL/TLS certificate and saves it to the path specified by the user.
Run the following code to install python3-certbot-dns-cloudflare.
sudo apt install python3-certbot-dns-cloudflare
2) Generate Cloudflare API key
Log in to your Cloudflare account and go to “My Profile”.
Go to the “API Tokens” section and click the “Create Token” button.
In the “Use Template” section, select the “Edit Zone DNS” template.
After selecting access to the Zone, click the “Continue to Summary” button.
Name the token and store the generated token value in a safe place.
Article image 1
3) Save API Token
Create the /root/.secrets/certbot directory.
Create the /root/.secrets/certbot/cloudflare.ini file.
Enter email address (used for urgent renewal and security notices) (Enter ‘c’ to cancel): Enter your email address (c to cancel)
2) Code description
The above code is a command that uses Certbot to generate a certificate for the example.com domain.
certbot : Runs the Certbot tool.
certonly: Only generates a certificate and does not connect to the web server. (Only performs certificate issuance)
–dns-cloudflare : Issue a certificate via domain verification against Cloudflare DNS.
–preferred-challenges dns-01: Uses dns-01, one of the DNS-based domain resolution methods.
–dns-cloudflare-propagation-seconds 20 : Number of seconds to wait for Cloudflare DNS updates to complete. Here it is set to 20 seconds.
–dns-cloudflare-credentials /root/.secrets/certbot/certbot-cloudflare.ini : Path to the file containing credentials to access the Cloudflare API. Here we use the /root/.secrets/certbot/cloudflare.ini file.
-d example.com : The domain name to issue the certificate to, here example.com is used.
2) Confirmation of issuance
The issued certificate is created in the domain folder under /etc/letsencrypt/live.
A total of 4 files (cert.pem, chain.pem, fullchain.pem, privkey.pem) are created.
4. Additional study material
Here are links to official documentation and references from Let’s Encrypt and Certbot.
Let’s Encrypt official documentation: https://letsencrypt.org/docs/
Certbot official documentation: https://certbot.eff.org/docs/
This article is part of Thinknote’s English server and infrastructure archive. It focuses on practical Linux, Ubuntu, web-server, database, SSH, firewall, or hosting operations that readers can adapt to their own environment.
How should I use this guide?
Use it as a practical checklist and concept guide. Before applying commands on a live server, verify package names, OS versions, ports, and backup requirements for your own setup.
Memory caching methods available in Ubuntu include APCu, Redis, and Memcached. Each caching tool must be selected for different purposes and requirements.
For example, APCu can improve the performance of PHP code, but it can only be used on a single server, making it unsuitable for distributed environments.
Redis provides a variety of data structures and clustering capabilities, making it suitable for complex applications.
Memcached is designed to support large-scale throughput in a distributed environment.
1) APCu (Alternative PHP Cache user caching)
APCu is a PHP extension used to cache data within a local server and is suitable for use in a single server environment. APCu does not allow sharing of data between processes, and data is kept only in that process.
A memory caching system for PHP.
You can cache data by accessing PHP code directly.
It can only be used on a single server and is not suitable for distributed environments.
APCu stores data natively in memory, providing fast read/write speeds.
However, APCu does not support data retention and replication, so data may be lost in the event of a server failure.
2) Redis
Redis is an open source in-memory data structure store that can scale out in multi-server environments and store data both in memory and persistently on disk. It supports a variety of data structures (strings, hashes, lists, sets, etc.) and can also be used as a message broker through the Pub/Sub mechanism.
It operates as a single thread and uses an event-driven architecture to solve concurrency problems.
It supports a variety of data structures, including strings, hashes, lists, sets, and sorted sets.
You can build a message-based architecture by supporting the Publish/Subscribe (Pub/Sub) mechanism.
Supports distributed systems such as master-slave replication and Redis clusters.
We provide a variety of performance monitoring and management tools to help you monitor the health of your database instances and optimize performance.
3) Memcached
Memcached is a distributed memory object cache system that can scale out in a multi-server environment and stores data in memory. Data is stored in key-value format and does not support complex data structures.
It is a distributed object caching system.
It is used to store and retrieve data in key-value form.
It is suitable for use in a distributed environment and allows data to be shared between multiple servers.
Memcached is a simple key-value store and does not support complex data structures.
Memory usage is large and data is not stored on disk, so data may be lost in the event of a server failure.
Typically, APCu, Redis, and Memcached can all be installed and operated.
Server resources (memory and CPU) must be considered when operating all systems simultaneously, and the setup and operation of each cache system must be understood and optimized. You should also consider data consistency and synchronization issues.
2. APCu caching
1) Install APCu
To install APCu, run the following command:
sudo apt install php8.2-apcu
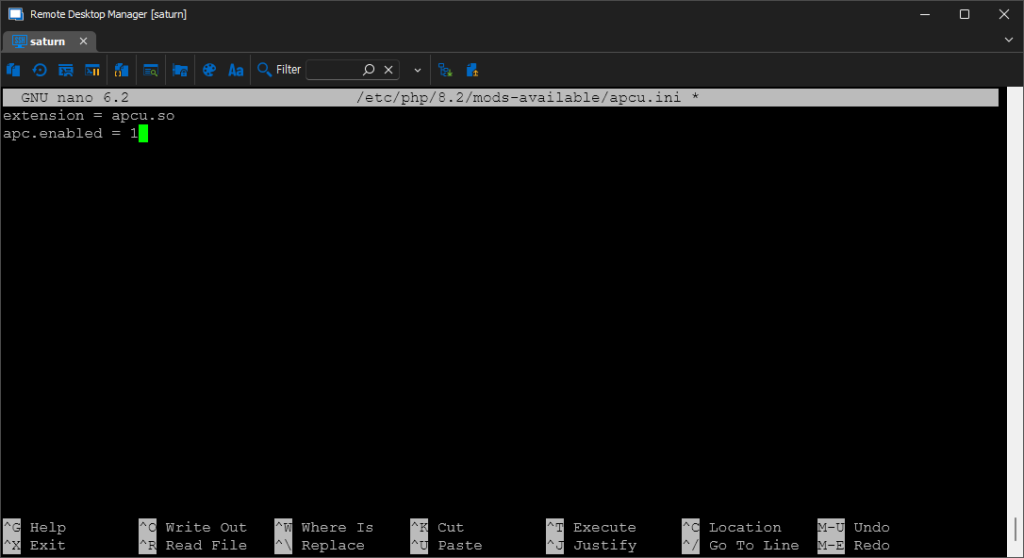
2) Activate APCu (acpu.ini)
Run the following command to open the PHP configuration file. For PHP version, enter the PHP version installed on the server.
If you use Apache web server, you need to edit /etc/php/8.2/apache2/php.ini.
sudo nano /etc/php/8.2/apache2/php.ini
If you use PHP in PHP-FPM (PHP FastCGI Process Manager), edit sudo nano /etc/php/8.2/fpm/php.ini or edit the acpu.ini file. If there is no acpu.ini file, create the /etc/php/8.2/mods-available/apcu.ini file and paste the following content into it.
sudo nano
/etc/php/8.2/mods-available/apcu.ini
extension = apcu.so
apc.enabled = 1
Article image 1
Activate the apcu module with the following command.
sudo phpenmod -v 8.2 apcu
Restart the nginx server for the changes to take effect.
sudo systemctl restart nginx
3) Check APCu execution (acpu.ini)
You can run the command below to print the results of the phpinfo() function and check APCu-related settings, version information, directory path, etc.
php -i | grep apcu
1. Redis caching
1) Install Redis
To install Redis, run the following command: Once installation is complete, the Redis server will start automatically
sudo apt install redis-server
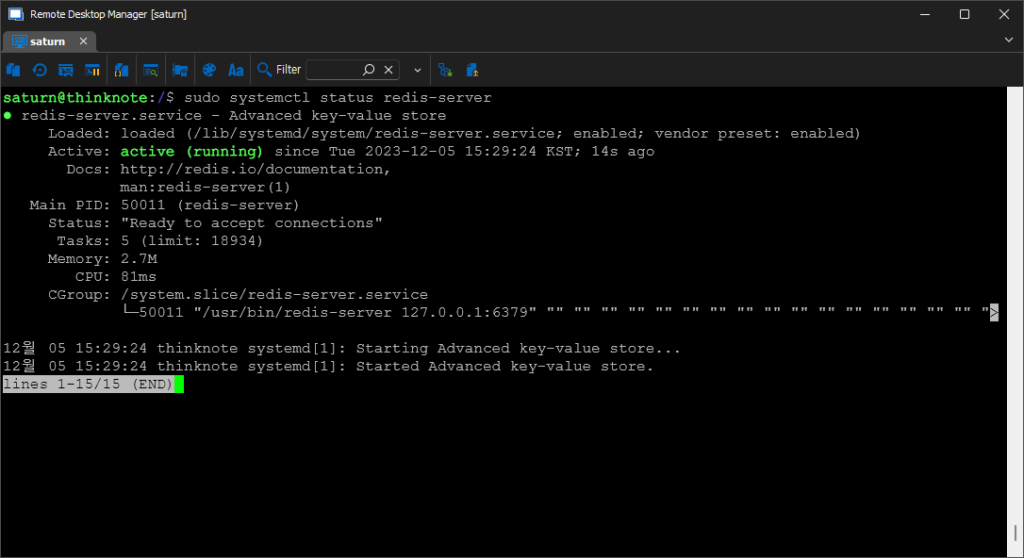
2) Check Redis status
Run the following command to check the service status. After verifying that your Redis server is running normally, you can modify the Redis configuration file as needed. The configuration file is located in the path /etc/redis/redis.conf
sudo systemctl status redis-server
sudo usermod -a -G redis www-data
Article image 2
3) Firewall settings (iptables)
Open port 6379 used by redis-server and save and reload iptable.
sudo iptables -A INPUT -p tcp --dport 6379 -j ACCEPT
sudo netfilter-persistent save
sudo netfilter-persistent reload
4) Linking Redis and PHP
Install the Redis PHP extension module.
sudo apt install php8.2-redis
Restart the nginx server for the changes to take effect.
sudo systemctl restart nginx
5) Activate Redis (redis.ini)
Add the code below in sudo nano /etc/php/8.2/mods-available/redis.ini.
You can check the connection and operation with Redis by creating a new PHP file and writing the following code (value output):
<?php
$redis = new Redis();
$redis->connect('localhost', 6379);

// example example example example example
$redis->set("key", "value");
echo $redis->get("key");

// example example example example example
$redis->hSet("hash", "field", "value");
echo $redis->hGet("hash", "field");

// example example
$redis->close();
?>
2. Memcached caching
1) Install Memcached
Run the following command to install Memcache.
sudo apt install memcached
2) Start Memcached service
Run the following command to start the Memcached service.
sudo systemctl start memcached
sudo systemctl status memcached
Run the code below to automatically start the Memcached service on boot.
sudo systemctl enable memcached
3) Firewall settings (iptables)
Memcached runs on port 11211 on localhost (127.0.0.1). Open iptables port 11211 for Memcached to run.
sudo iptables -A INPUT -p tcp --dport 11211 -j ACCEPT
sudo netfilter-persistent save
sudo netfilter-persistent reload
Additionally, you can edit the following settings files to configure your application to use Memcached:
Modifying memory quotas: You can adjust quotas by modifying the value of the -m option in the /etc/memcached.conf file.
Modify binding address: You can bind to a different IP address by changing the -l option value in the /etc/memcached.conf file.
Modifying the port: You can set it to a different port number by changing the value of the -p option in the /etc/memcached.conf file.
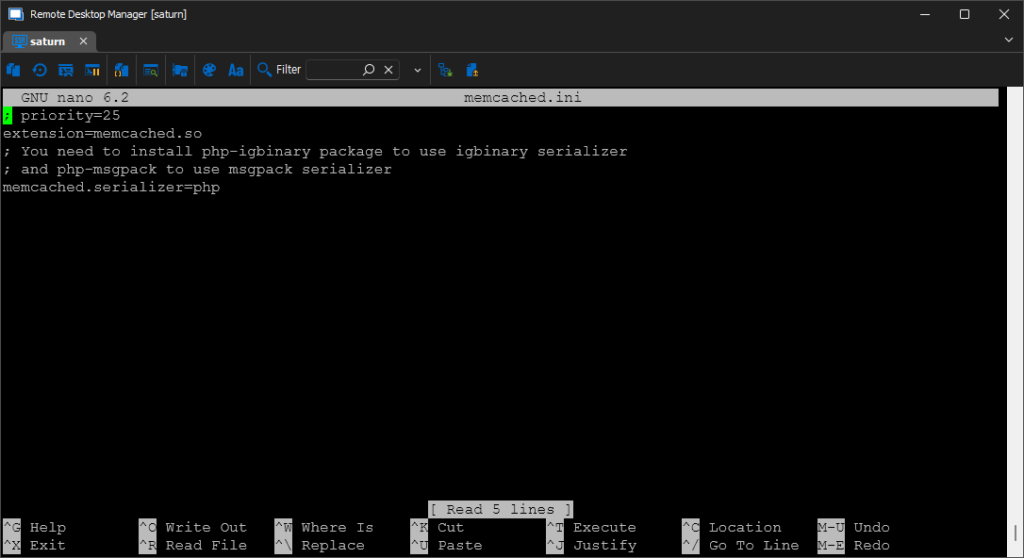
4) PHP integration (php.ini)
Run the command below to install the package.
sudo apt install php8.2-memcached
In the /etc/php/8.2/fpm/php.ini file or /etc/php/8.2/mods-avaiable/memcached.ini, find the extension=memcached.so line, uncomment it and save it.
You can use the following code to connect to a Memcached server and store, retrieve and test values. (value output is normal)
<?php
$memcached = new Memcached();
$memcached->addServer('localhost', 11211);

$memcached->set('key', 'value', 60); // 60example example example example

$value = $memcached->get('key');
echo $value; // example example example
?>
4. Additional study material
Links to official documentation and references related to APCu, Redis, and Memcached.
1) APCu
APCu official documentation: https://www.php.net/manual/en/book.apcu.php
“APCu: User Caching and Optimization” (with information and examples): https://www.sitepoint.com/caching-with-apcu/
“APCu vs Redis vs Memcached” (comparison and performance testing): https://haydenjames.io/apcu-vs-redis-vs-memcached/
2) Redis
Redis official documentation: https://redis.io/documentation
“Redis Basics for Beginners” (an introduction to basic concepts): https://www.digitalocean.com/community/tutorials/redis-basics-for-beginners
“Redis Tutorial” (Learn Redis with examples): https://www.tutorialspoint.com/redis/index.htm
3) Memcached
Memcached official documentation: https://memcached.org/documentation
“Memcached Tutorial” (including basic concepts and examples): https://www.tutorialspoint.com/memcached/index.htm
“Introduction to Memcached” (Memcached introduction and use cases): https://phoenixnap.com/kb/memcached-tutorial
Thinknote
Good article to read together
Install PHP 8 (ubuntu)
Setting up Nginx + Php8
Install Nginx web server (ubuntu)
Free HTTPS setup (Let’s Encrypt, Cloudflare)
Install Nginx web server (Centos 8)
Related Reading
Continue with these related Thinknote English articles in the Server & Infrastructure cluster.
This article is part of Thinknote’s English server and infrastructure archive. It focuses on practical Linux, Ubuntu, web-server, database, SSH, firewall, or hosting operations that readers can adapt to their own environment.
How should I use this guide?
Use it as a practical checklist and concept guide. Before applying commands on a live server, verify package names, OS versions, ports, and backup requirements for your own setup.
Nextcloud is a cloud storage and collaboration platform for personal and enterprise use. Nextcloud is open source software developed by Frank Karlitschek after leaving the ownCloud project in 2016. members of the ownCloud community gathered together to create Nextcloud and began development.
1) Nextcloud Features
Nextcloud is widely used by individuals and businesses as a secure and efficient cloud storage and collaboration tool.
File Sync and Share: Nextcloud allows you to sync and share files across multiple devices.
Security: Nextcloud provides a variety of security features, including data encryption and two-factor authentication, to enhance user data protection.
Collaboration tools: Include collaboration tools like document editing, calendar, address book, and more to help you accomplish a variety of tasks with your team.
App Ecosystem: We offer a variety of apps and extensions to extend Nextcloud to fit your needs.
Self-hosted: Nextcloud is available on-premise or in the cloud, allowing users to run their own servers to manage their data.
2) Advantages
Privacy Protection: Nextcloud is easy to protect personal information because users can directly manage their data.
Extensibility: A variety of apps and extensions allow you to extend Nextcloud to fit your needs.
Collaboration features: It provides various collaboration tools such as document editing and calendar, making it easy to work with team members.
3) Disadvantages
Technical Knowledge Required: Must have a technical understanding of server setup and maintenance.
Initial setup complexity: Initially setting up Nextcloud can be a bit complicated.
4) System Requirements
Platform Options Operating System (64-bit) Ubuntu 22.04 LTS (recommended) Ubuntu 20.04 LTS Red Hat Enterprise Linux 8 (recommended) Debian 12 Linux Enterprise Server 15 openSUSE Leap 15.4 CentOS Stream Database MySQL 8.0+ or MariaDB 10.3/10.4/10.5/ 10.6 (recommended) Oracle Database 11g (enterprise) (only as part of subscription) ) PostgreSQL 10/11/12/13/14/15 SQLite (recommended for testing and minimum instances only) ) Web server Apache 2.4 and or (recommended) mod_phpphp-fpm nginx php-fpm PHP runtime 8.0 (deprecated)) 8.1 8.2 (recommended)
3) Hardware Requirements
Processor: 1 GHz or faster dual core processor
Memory: At least 512MB RAM (recommended: 2GB or more)
Storage space: At least 10GB of free space
Network: Network interface for Internet connection
2. Install Nextcloud
Nextcloud installation includes all-in-one VM, all-in-one Docker, and web installer installation methods. Here, we will proceed with the installation using the web installer.
1) Create folder and download installation file
Create a folder to install nextcloud. Create a logs folder to store web logs and a public folder to install nextcloud.
Paste the code below and change the domain part to your own domain.
upstream php-handler {
        server unix:/var/run/php/php8.2-fpm.sock;

}
# Set the `immutable` cache control options only for assets with a cache busting `v` argument
map $arg_v $asset_immutable {
        "" "";
        default "immutable";
}
server {
        listen 443 ssl http2;
        listen [::]:443 ssl http2;

        server_name example.com;

        ssl_certificate /etc/letsencrypt/live/example.com/fullchain.pem;
        ssl_certificate_key /etc/letsencrypt/live/example.com/privkey.pem;
        ssl_trusted_certificate /etc/letsencrypt/live/example.com/chain.pem;
        ssl_dhparam /etc/ssl/certs/dhparam.pem;

        ssl_protocols TLSv1.2 TLSv1.3;
        ssl_prefer_server_ciphers on;
        ssl_ciphers TLS_AES_256_GCM_SHA384:TLS_CHACHA20_POLY1305_SHA256:TLS_AES_128_GCM_SHA256:ECDHE-RSA-AES256-GCM-SHA384:DHE-RSA-AES256-GCM-SHA384:ECDHE-RSA-AES128-GCM-SHA256;
        ssl_ecdh_curve secp384r1;
        ssl_session_timeout 10m;
        ssl_session_cache shared:SSL:10m;
        ssl_session_tickets off;
        ssl_stapling on;
        ssl_stapling_verify on;
        resolver 1.1.1.1 1.0.0.1 valid=300s;
        resolver_timeout 5s;

        access_log /var/www/nc.skdream.com/logs/access.log;
        error_log /var/www/nc.skdream.com/logs/error.log;

        root /var/www/nc.skdream.com/public/;
        #index index.php index.html;

        #Nextcloud
        # Prevent nginx HTTP Server Detection
        server_tokens off;

        # HSTS settings
        # WARNING: Only add the preload option once you read about
        # the consequences in https://hstspreload.org/. This option
        # will add the domain to a hardcoded list that is shipped
        # in all major browsers and getting removed from this list
        # could take several months.
        add_header Strict-Transport-Security "max-age=15768000; includeSubDomains; preload" always;

        # set max upload size and increase upload timeout:
        client_max_body_size 512M;
        client_body_timeout 300s;
        fastcgi_buffers 64 4K;

        # Enable gzip but do not remove ETag headers
        gzip on;
        gzip_vary on;
        gzip_comp_level 4;
        gzip_min_length 256;
        gzip_proxied expired no-cache no-store private no_last_modified no_etag auth;
        gzip_types application/atom+xml text/javascript application/javascript application/json application/ld+json application/manifest+json application/rss+xml application/vnd.geo+json application/vnd.ms-fontobject application/wasm application/x-font-ttf application/x-web-app-manifest+json application/xhtml+xml application/xml font/opentype image/bmp image/svg+xml image/x-icon text/cache-manifest text/css text/plain text/vcard text/vnd.rim.location.xloc text/vtt text/x-component text/x-cross-domain-policy;

        # Pagespeed is not supported by Nextcloud, so if your server is built
        # with the `ngx_pagespeed` module, uncomment this line to disable it.
        #pagespeed off;

        # The settings allows you to optimize the HTTP2 bandwitdth.
        # See https://blog.cloudflare.com/delivering-http-2-upload-speed-improvements/
        # for tunning hints
        client_body_buffer_size 512k;

        # HTTP response headers borrowed from Nextcloud `.htaccess`
        add_header Referrer-Policy                   "no-referrer"       always;
        add_header X-Content-Type-Options            "nosniff"           always;
        #add_header X-Download-Options                "noopen"            always;
        add_header X-Frame-Options                   "SAMEORIGIN"        always;
        add_header X-Permitted-Cross-Domain-Policies "none"              always;
        add_header X-Robots-Tag                      "noindex, nofollow" always;
        add_header X-XSS-Protection                  "1; mode=block"     always;

        # Remove X-Powered-By, which is an information leak
        fastcgi_hide_header X-Powered-By;

        # Add .mjs as a file extension for javascript
        # Either include it in the default mime.types list
        # or include you can include that list explicitly and add the file extension
        # only for Nextcloud like below:
        include mime.types;

        # Specify how to handle directories -- specifying `/index.php$request_uri`
        # here as the fallback means that Nginx always exhibits the desired behaviour
        # when a client requests a path that corresponds to a directory that exists
        # on the server. In particular, if that directory contains an index.php file,
        # that file is correctly served; if it doesn't, then the request is passed to
        # the front-end controller. This consistent behaviour means that we don't need
        # to specify custom rules for certain paths (e.g. images and other assets,
        # `/updater`, `/ocs-provider`), and thus
        # `try_files $uri $uri/ /index.php$request_uri`
        # always provides the desired behaviour.
        index index.php index.html /index.php$request_uri;
        #types {
        #        text/javascript js mjs;
        #}
        # Rule borrowed from `.htaccess` to handle Microsoft DAV clients
        location = / {
                if ( $http_user_agent ~ ^DavClnt ) {
                        return 302 /remote.php/webdav/$is_args$args;
                }
        }

        location = /robots.txt {
                allow all;
                log_not_found off;
                access_log off;
        }


        # Make a regex exception for `/.well-known` so that clients can still
        # access it despite the existence of the regex rule
        # `location ~ /(\.|autotest|...)` which would otherwise handle requests
        # for `/.well-known`.
        location ^~ /.well-known {
                # The rules in this block are an adaptation of the rules
                # in `.htaccess` that concern `/.well-known`.

                location = /.well-known/carddav { return 301 /remote.php/dav/; }
                location = /.well-known/caldav  { return 301 /remote.php/dav/; }

                location /.well-known/acme-challenge    { try_files $uri $uri/ =404; }
                location /.well-known/pki-validation    { try_files $uri $uri/ =404; }

                # Let Nextcloud's API for `/.well-known` URIs handle all other
                # requests by passing them to the front-end controller.
                return 301 /index.php$request_uri;
        }


        # Rules borrowed from `.htaccess` to hide certain paths from clients
        location ~ ^/(?:build|tests|config|lib|3rdparty|templates|data)(?:$|/)  { return 404; }
        location ~ ^/(?:\.|autotest|occ|issue|indie|db_|console)                { return 404; }

        # Ensure this block, which passes PHP files to the PHP process, is above the blocks
        # which handle static assets (as seen below). If this block is not declared first,
        # then Nginx will encounter an infinite rewriting loop when it prepends `/index.php`
        # to the URI, resulting in a HTTP 500 error response.

        # to the URI, resulting in a HTTP 500 error response.
        location ~ \.php(?:$|/) {
                # Required for legacy support
                rewrite ^/(?!index|remote|public|cron|core\/ajax\/update|status|ocs\/v[12]|updater\/.+|ocs-provider\/.+|.+\/richdocumentscode\/proxy) /index.php$request_uri;

                fastcgi_split_path_info ^(.+?\.php)(/.*)$;
                set $path_info $fastcgi_path_info;

                try_files $fastcgi_script_name =404;

                include fastcgi_params;
                fastcgi_param SCRIPT_FILENAME $document_root$fastcgi_script_name;
                fastcgi_param PATH_INFO $path_info;
                fastcgi_param HTTPS on;

                fastcgi_param modHeadersAvailable true;         # Avoid sending the security headers twice
                fastcgi_param front_controller_active true;     # Enable pretty urls
                fastcgi_pass php-handler;

                fastcgi_intercept_errors on;
                fastcgi_request_buffering off;

                fastcgi_max_temp_file_size 0;
        }
        # Javascript mimetype fixes for nginx
        # Note: The block below should be removed, and the js|mjs section should be
        # added to the block below this one. This is a temporary fix until Nginx
        # upstream fixes the js mime-type
        location ~* \.(?:js|mjs)$ {
            types {
                text/javascript js mjs;
            }
            default_type "text/javascript";
            try_files $uri /index.php$request_uri;
            add_header Cache-Control "public, max-age=15778463, $asset_immutable";
            access_log off;
        }

        # Serve static files
        location ~ \.(?:css|svg|gif|png|jpg|ico|wasm|tflite|map|ogg|flac)$ {
            try_files $uri /index.php$request_uri;
            add_header Cache-Control "public, max-age=15778463, $asset_immutable";
            access_log off;     # Optional: Don't log access to assets

            location ~ \.wasm$ {
                default_type application/wasm;
            }
        }
        location ~ \.woff2?$ {
                try_files $uri /index.php$request_uri;
                expires 7d;         # Cache-Control policy borrowed from `.htaccess`
                access_log off;     # Optional: Don't log access to assets
        }

        # Rule borrowed from `.htaccess`
        location /remote {
                return 301 /remote.php$request_uri;
        }

        location / {
                try_files $uri $uri/ /index.php$request_uri;
        }


}

server {
        listen 80;
        listen [::]:80;

        server_name example.com;
        # Prevent nginx HTTP Server Detection
        server_tokens off;

        return 301 https://example.com$request_uri;
}
If you have not installed MariaDB, please refer to the following article: Installing and Managing MariaDB (MySQL) – Thinknote
Create a database to use with Nextcloud.
CREATE DATABASE nextcloud;
Create a new user. If you want to connect an existing user, you can omit it.
CREATE USER '[example example]'@'localhost' IDENTIFIED BY '[example]';
Grant permissions for the new database to the created user.
GRANT ALL PRIVILEGES ON [example example].* TO '[example example]'@'localhost';
Apply the changed permission settings.
FLUSH PRIVILEGES;
exit;
4) php requirements
To use Nextcloud, an additional PHP module is required. Below are the requirements presented in the Nextcloud manual.
PHP (see System requirements for a list of supported versions)
PHP module ctype
PHP module curl
PHP module dom
PHP module fileinfo (included with PHP)
PHP module filter (only on Mageia and FreeBSD)
PHP module GD
PHP module hash (only on FreeBSD)
PHP module JSON (included with PHP >= 8.0)
PHP module libxml (Linux package libxml2 must be >=2.7.0)
PHP module mbstring
PHP module openssl (included with PHP >= 8.0)
PHP module posix
PHP module session
PHP module SimpleXML
PHP module XMLReader
PHP module XMLWriter
PHP module zip
PHP module zlib
Enter the code below to install uninstalled modules. If PHP8 is not installed, please refer to the following article. Install PHP 8 (ubuntu) – Thinknote
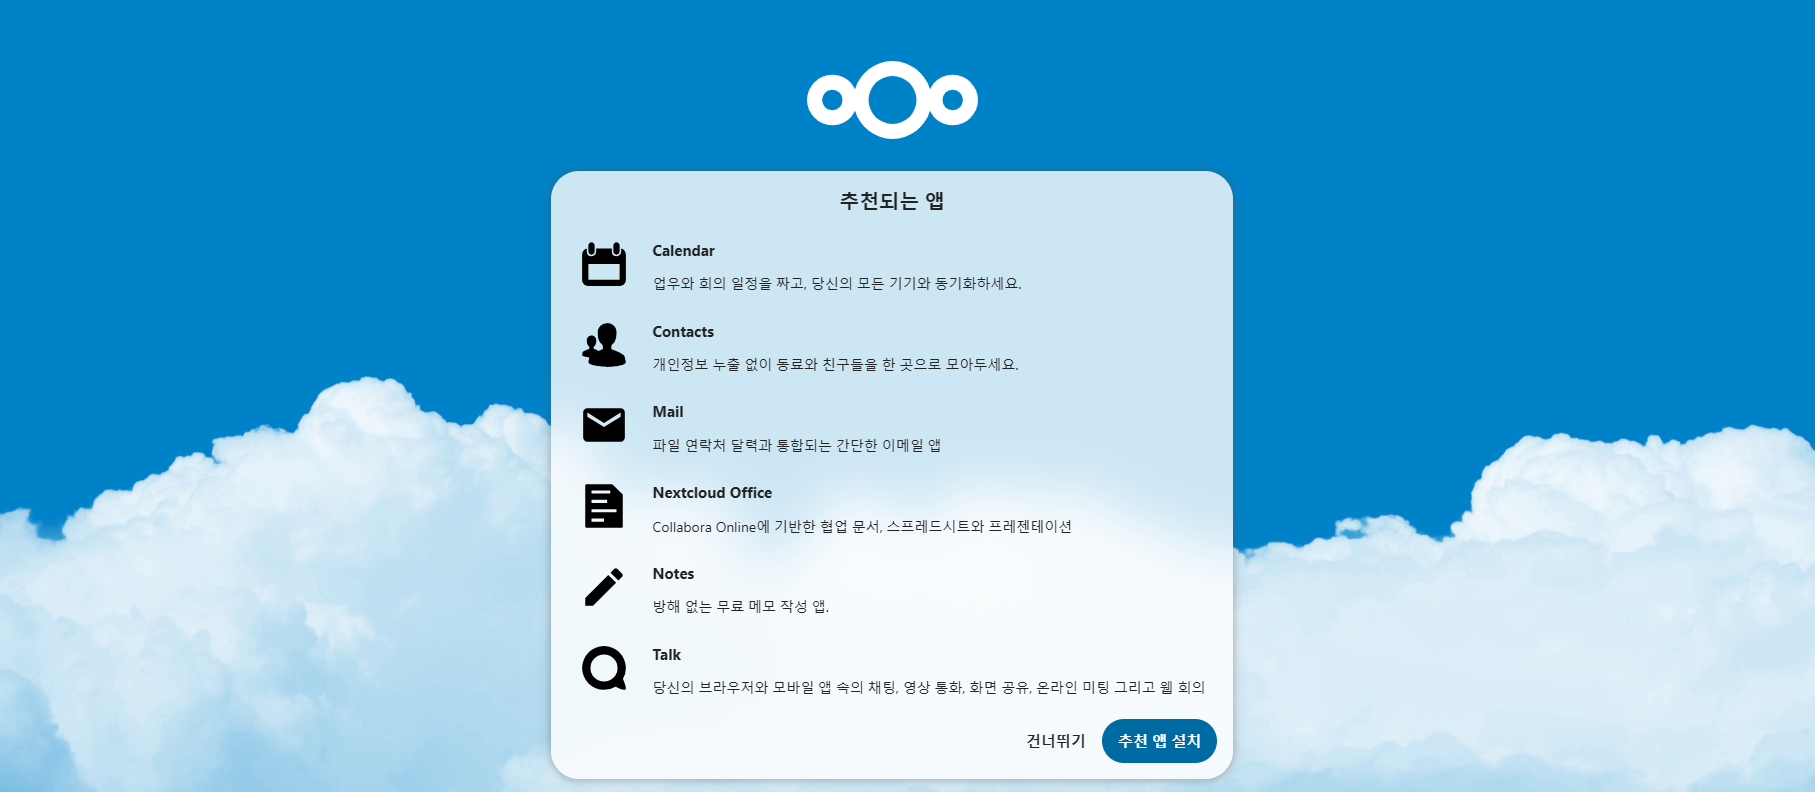
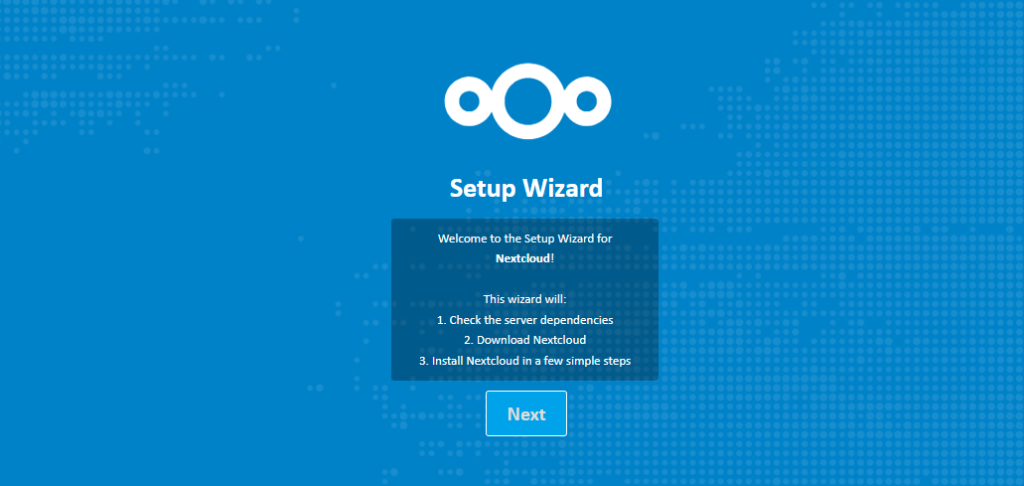
Access the web installer on your domain and proceed with the installation.
https://example.com/setup-nextcloud.php
Article image 1
If the error Fatal error: Uncaught ValueError: Invalid or uninitialized Zip object in occurs, it is because the decompression path is /var/www/html. In this case, you must unzip and install it yourself. If it is unzipped, you can access it using the domain URL.
Article image 2
Installation is complete.
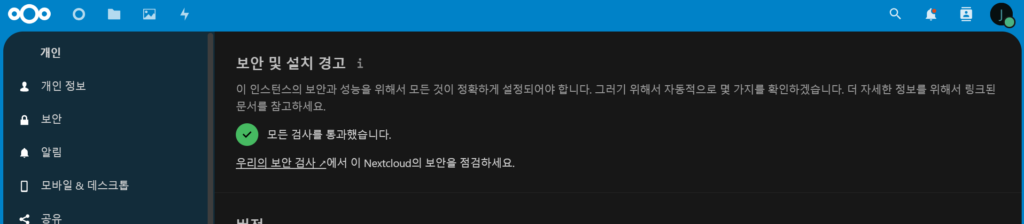
4. Check security and alerts
Log in as administrator and go to administrator settings. If a security and installation warning message appears at this time, please refer to the solutions for each item.
1) Errors related to file integrity
Uncomment clear_env = no in /etc/php/8.2/fpm/pool.d/www.conf
sudo nano /etc/php/8.2/fpm/pool.d/www.conf
clear_env = no #example
2) Error in system environment variable getenv(‘path’)
Check the list of files related to the integrity of the administrator settings and delete problematic files. Then run the code below to check if the integrity issue is resolved.
sudo -u www-data php occ integrity:check-core
3) PHP memory limitations
In php.ini, set the memory_limit value and upload_max_filesize to 512M or more.
Memory_limit = 1G
upload_max_filesize = 1G
4) Set country phone number
Add the following to the nextcloud config.php file:
This article is part of Thinknote’s English server and infrastructure archive. It focuses on practical Linux, Ubuntu, web-server, database, SSH, firewall, or hosting operations that readers can adapt to their own environment.
How should I use this guide?
Use it as a practical checklist and concept guide. Before applying commands on a live server, verify package names, OS versions, ports, and backup requirements for your own setup.